Wednesday, June 30, 2010

Yellow squash chorizo tacos

Because we've had an abundance of squash... I've been forced to get creative with some recipes. I found this one and it was delish!!!

Yellow Squash Chorizo Tacos

1 Tbsp olive oil
1 onion, diced
1 medium yellow squash, diced
1 tsp kosher salt
A few grinds black pepper
1/2 tsp ground cumin
10 oz pork chorizo ( I used turkey chorizo... who knew?!)
1 14 oz can diced tomatoes, drained
1 14 oz can black beans, rinsed and drained
Tortillas for serving
Guacamole for serving

In a large skillet over medium high heat, add the olive oil. Once the oil runs quickly in the pan, add the onion, yellow squash, salt, pepper and cumin. Saute until onion is softened, about 5 minutes. Add chorizo and break up using a wooden spoon. Once chorizo is broken up, add the tomatoes and black beans. Stir until well combined. Cook until chorizo is cooked through, about 10 minutes, stirring often.

Serve a scoopful of chorizo filling in a tortilla with guacamole.

post signature


Sunday, June 27, 2010

Ketchup, Catsup, Catchup, Katsup, Catsip, Cotsup, Kotchup, Kitsip, Catsoup, Katshoup, Katsock, Cackchop, Cornchop, Cotpock, Kotpock, Kutpuck, Kutchpuck and Cutchpuck


No Matter How You Spell It,
It's America's Favorite Condiment...

Everything You Always Wanted to Know About Ketchup (Catsup)
(source: globalgourmet.com//food/sleuth/0799/)


We've been blessed this year with plenty of rain... which in turn means lottsa veggies in our garden!! We (errr Mr. Wondeful) planted 19 tomato plants this year (Romas and Celebrities) and they've been so fruitful for us! We've already made hot sauce and tomato basil sauce... but we still had mucho tomatoes!
Tomato Basil Summer Sauce
Salsa
It was pretty much a no-brainer what we'd do with our next harvest... MAKE CATSUP!!

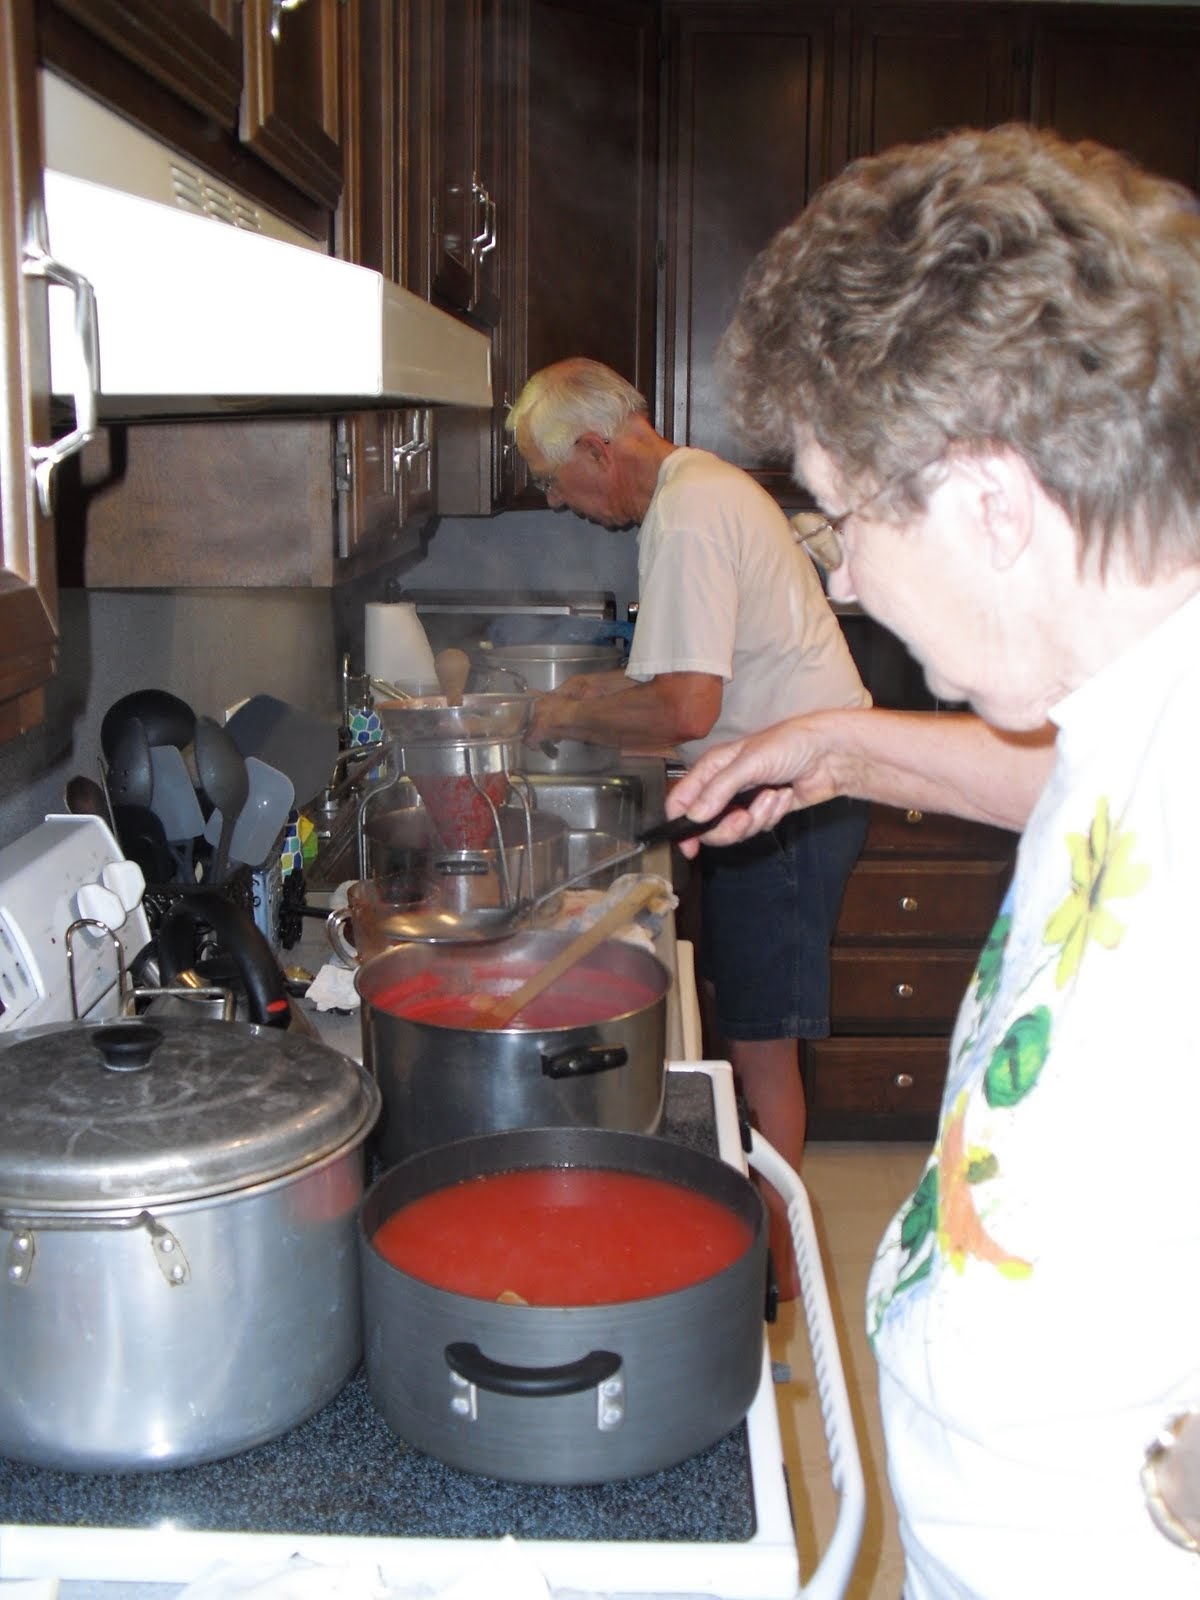
Making catsup has long been a family tradition on my dad's side of the family, so naturally we've decided to carry it on with our family.  My mom and dad came over bright and early (yes 8:30 is early to me!) to get started.  Since Mr. Wonderful and I were catsup-making virgins, we needed close supervision and instruction. It's much better to have on the job training for this sorta thing!  

If you've ever made catsup before, you know that in order to get a decent yield you must start with a LOT of tomatoes!

We used a ton of our own home-grown tomatoes and then were lucky enough to be given quite a few more from Mr. Wonderful's uncle who lives just down the road from us.  We ended up with so many tomatoes that we spent a total of 13 hours making the yummy condiment.  How much catsup did we end up, after slaving over the stove for 13 hours you ask? Well, we're proud to say that we made 35 pints, larger than any batch my parents have made to date!

Personally what I treasured the most about making it was the time spent together with my parents.  Watching, listening, laughing and learning from them is simply priceless.  If you'd have asked me 10 years ago if I'd ever see myself making catsup or canning anything I would have bet money that my answer would have been NO!!

It's funny how over time I've starting walking more closely in their footsteps, what a wonderful thing!!

Mom and dad, hard at it!


 Get all the advice and instruction you can, so you will be wise the rest of your life.
~ Proverbs 19:20, NLT

My father very rarely drinks a beer... this is proof that making catsup is hard work!
And it's a messy job...


But it's so fun!


Oh are you wondering what the munchkins were up to the whole time? Oh nothing much... just being angels of course!
Munchkins 2 and 3
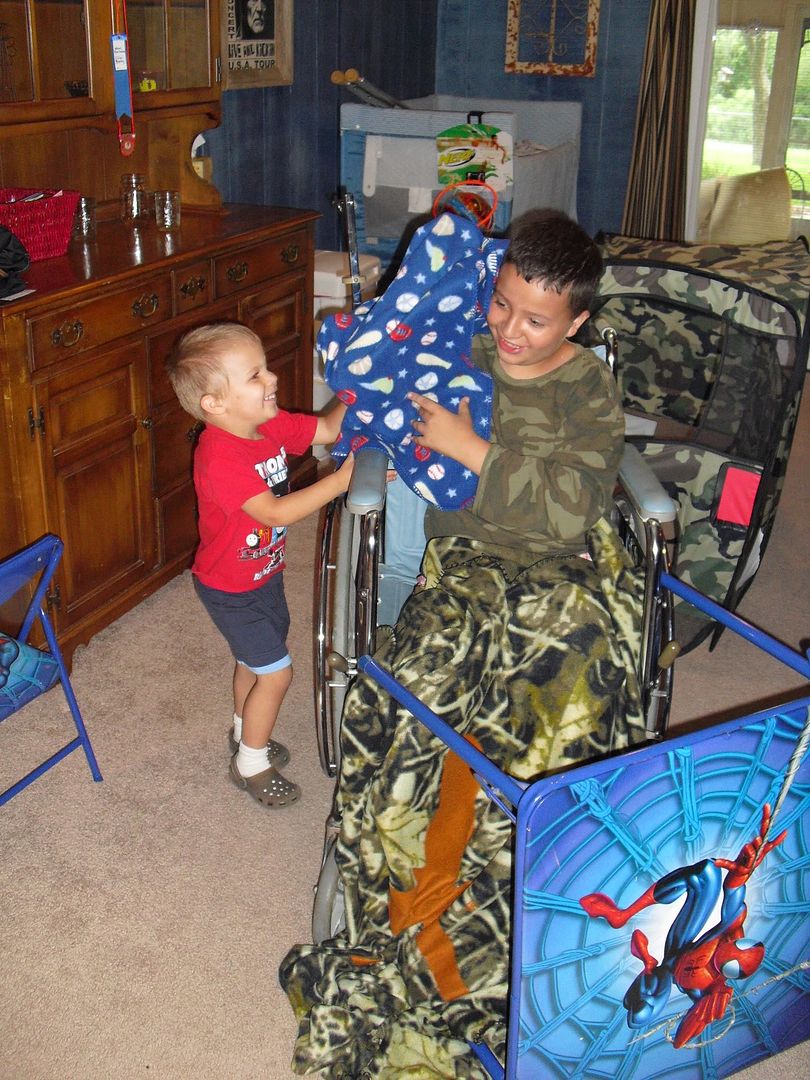
Munchkins 1 and 2 (1 has a broken leg, hence the wheelchair)


post signature


Thursday, June 24, 2010

From uh-oh to oh-wow!


We had a woopsie with our (wedding gift) ceramic bathroom trashcan! I wanted something cute to replace it, but I found nothing at a reasonable price, so I headed to Goodwill. I found this ho-hum maroon and gold trashcan that I totally didn't love one bit, but I saw potential.

First I cleaned it up and then sanded that bad boy back to bare wood. I decided to paint it black and I knew I wanted to adorn it with a 5 (since there's 5 peeps in my family). I printed out a large 5 from my computer,  traced it onto contact paper, cut it out and then used it as a stencil. Next I just spray painted it with a couple of coats of white paint, and then finally traced around the 5 with a paint pen to clean up the edges and that's it!

It was pretty simple and I think it makes a a nice improvement! The best part is that it only cost me a buck fifty!
post signature


Saturday, June 19, 2010

Super Dad!


I am blessed to be married to a true SUPER DAD. He’s totally involved in the lives of all of our boys and is constantly putting the needs of everyone else before his own needs and desires. I cannot begin to describe how truly fabulous he is! If our boys inherit half of his honesty, dedication, faithfulness, compassion, and integrity, they’ll be fine men someday.


I am also blessed to be the daughter of another Super Dad. He and my mom are the most giving people that I've ever known. Thank you for all of your love and guidance and most importantly being a great example for me.


I love you both very much!


post signature

Friday, June 18, 2010

I live it Texas, y'all!

I totally realize that this animal pattern might not be everyone's cup of tea. But for US, it's perfect, don't judege!!! Before the re-do the chairs were simply a ho-hum plain-o tan pattern, and AFTER we've got mucho personality!  Who wouldn't want to perch their rumps on these babies?

We live the in the country y'all and we love this cow-hide pattern. It fits our family to the T.  Lately we've been on the lookout for a cow-hid rug, but the cost of one of those suckers just isn't at the top of the budget expenditures right now. What's a girl to do? Well naturally I check all of my online resources ... Ebay to the rescue! I found this fabric on for $5 per yard, SCORE! It is soft and fuzzy and simply perfect!

So here ya go... before and afters!  And yes I totally realize that we have 5 family members and a 4-person table... thank goodness the two little ones are still in high chairs so we have a little time to enjoy our new seat covers!

Recovering your dining room chairs has got to be one of the simplest makeovers you can do.  The hardest part just might be deciding on the fabric. All you have to do is remove the seats from the chairs or if you're like me... just ask Mr. Wonderful to remove them. Next stretch the fabric from side to side and have Mr. Wonderful flex his muscles with the staple gun. We stapled the corners last and it worked marvelously!  Before putting them into use we sprayed Scotch Guard to help prevent stains... and that's it!

I even had enough fabric to make these three soft throw pillows for the sofa! Yee Ha!

post signature


Monday, June 14, 2010

Simplify!


I've come to grips with the fact that I just need to get rid of some (tons of) JUNK! I've got too much of everything. I think that we as a nation just tend to hang on to stuff for too long. For now I'm just going to focus on my family, ha! I hang on to so much stuff that I think I'll "need" someday, but in reality most of it has been sitting in boxes in our garage, or in a closet for a couple of years with being used once. So I've decided to launch Operation Simplify in this little casa that we call home.  I am a bit overwhelmed with beginning this task that I've put before me, so I've decided to start small, baby steps right!?

What better place to begin than in my own closet? I don't wear a third of the clothes that I have hanging in my closet. I think that I've always felt like I needed quantity over quality when it comes to wardrobe. The older I get the more I realize that just isn't the case. I tend to only buy myself things that are either on super clearance or are sold at inexpensive stores (Walmart, Ross, Melrose, Burkes, Agaci etc.). The problem with this theory is that I very seldom LOVE my clothes, not to mention the fact that they just don't last. It's so strange I have no problem spending money on Mr. Wonderful's clothes, or any of the munchkins, but when it comes to me I just can't do it! So I decided to purge my clothes, you know get down to just the clothes I actually wear (amazing concept, huh?!). There were clothes in there that I hadn't worn in years for various reasons... (ok so maybe I can't fit into them anymore!) but we're just going to say that they're no longer my style.

 Here are some photos of today's accomplishment! (Oh and in case you're wondering the tiny clothes pictured do NOT fit me... they belong to my youngest munchkin!) Now I have an excuse to run to our local Goodwill (with 3 stuffed bags to donate)!! The best part is just to step back and say...Ahhhhhhh!

Next I'll tackle hmmm maybe our bathroom cabinets?! Eventually my entire house and garage!

Purge, Purge, Purge

SIMPLIFY


post signature


Thursday, June 10, 2010

$20 DIY Display Shelves


Okay, so if you're anything like me you've got SOMETHING to display! Whether it's gorgeous plates, awards, diplomas... there's bound to be something you own that deserves a prominent spot. In my case it's my oldest son's books. We probably need to make a dozen more of these suckers to hold all of his books, but you gotta start somewhere!

I've drooled over Pottery Barn's shelves for quite a while, but the drooling wasn't getting me anywhere,  so I decided to take matters into my own hands. Well okay so not really MY hands, but Mr. Wonderful's much more capable hands.

First thing was to figure out exactly how to build these little guys. As luck would have it I found a great tutorial online. And because I'm just so generous, I'll share this great tute with you! So if you're feeling DIYish today or maybe this weekend go ahead and make yourself some of these! The beauty is that you can completely customize them to match any decor! Just click here and then head to your local Home Depot or lumber yard of your choice.

We built all four shelves for 20 bucks! Pottery Barn's shelves are great, but a tad bit (cough, cough) pricey. I think ours look just as great for much, much less!

Happy DIYing!

post signature

Tuesday, June 8, 2010

Baby Cardinals!

Update: They've all flown away!!


These little guys are right outside my front door, in our hanging basket. It's been fun watching them grow! Something I've learned about cardinals is that the daddy is NOT very involved at all. We also have a swallow family inhabiting our front porch and the daddy is super involved. Strange!


post signature

Monday, June 7, 2010

Cinnamon Sugar Muffins


These little boogers are divine!! Definitely just a special treat since they're full o'sugar... but every now and then a little treat is in order!

Ingredients
  • 1-¾ cup Flour
  • 1-½ teaspoon Baking Powder
  • ½ teaspoons Salt
  • ½ teaspoons Nutmeg
  • ½ teaspoons Cinnamon
  • ⅓ cups Oil
  • ¾ cups White Sugar
  • 1 whole Egg
  • ¾ cups Milk
  • _____
  • FOR THE TOPPING:
  • ¼ cups Butter
  • ⅓ cups White Sugar
  • 1 Tablespoon Cinnamon
Preparation Instructions:
Combine flour, baking powder, salt, nutmeg and cinnamon.
Combine oil, sugar, egg and milk. Add dry ingredients and stir only to combine.
Bake at 350 degrees for 15-20 minutes. Meanwhile, melt the butter in a bowl. Combine the white sugar with the cinnamon in another bowl.
Shake muffins out while still hot. Dip muffins in butter, then into the sugar/cinnamon mix. Let cool.

post signature